Thursday, April 10, 2014

Dining Room Progress: Our Plank Wall

This is the post that has taken since early January to finish. No reason. I’m just lazy like that. The last thing I shared about my dining room was the before pictures and a mood board. Oh yeah, and this sneak peek:


And here that wall is now:

 
Overall, we’ve painted the walls, added the horizontal plank accent wall, bought a rug and put up window treatments. But today I’m just gonna talk about the wall (simply because the rest of my dining room is covered in, you know, general day to day stuff.) That plank wall was a must, due to some horrible drywall work by the previous owners. I always knew we’d either have to completely redo the drywall or cover it somehow. Pinterest to the rescue! I found some great inspiration here, here, and here.
I couldn’t use regular boards like I've seen other people use, because my window trim isn’t deep enough. We found these thin 8’ tongue and grove planks at Lowe’s:
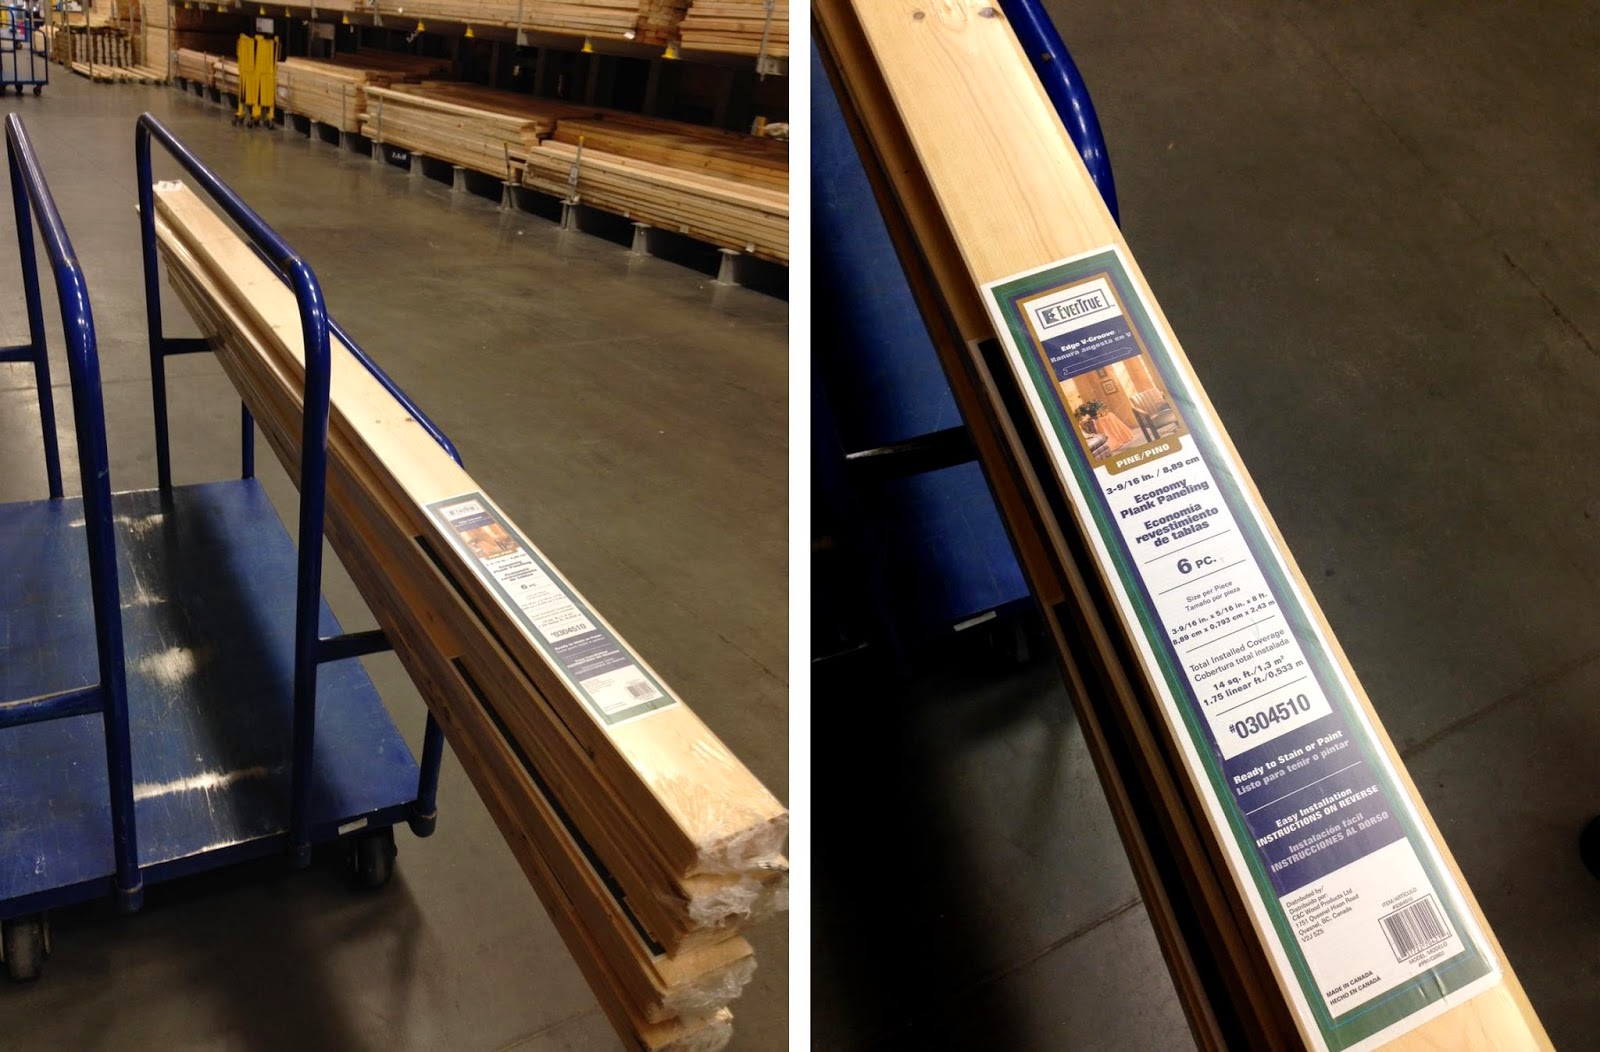
 

My wonderful hubby did all the handy work (on his vacation, no less.) I just did the painting. It’s a pretty self explanatory process. The planks came in 8’ lengths so we knew there would be seams and planned accordingly. The wall is 11’ wide so we did one whole length plus a 3’ section, swapping those lengths on the next row up so we had a nice zig-zag of seams (as opposed to one long seam running up one side of the wall.) I really liked these planks because they were easy to install and had the look we were going for. I wanted it a little rustic with a slight gap between each board, so the tongue and groove feature is perfect. It was just a matter of snapping them together and securing them to the wall with a few nails (6-10 depending on the length). Here’s the wall au naturale:

 
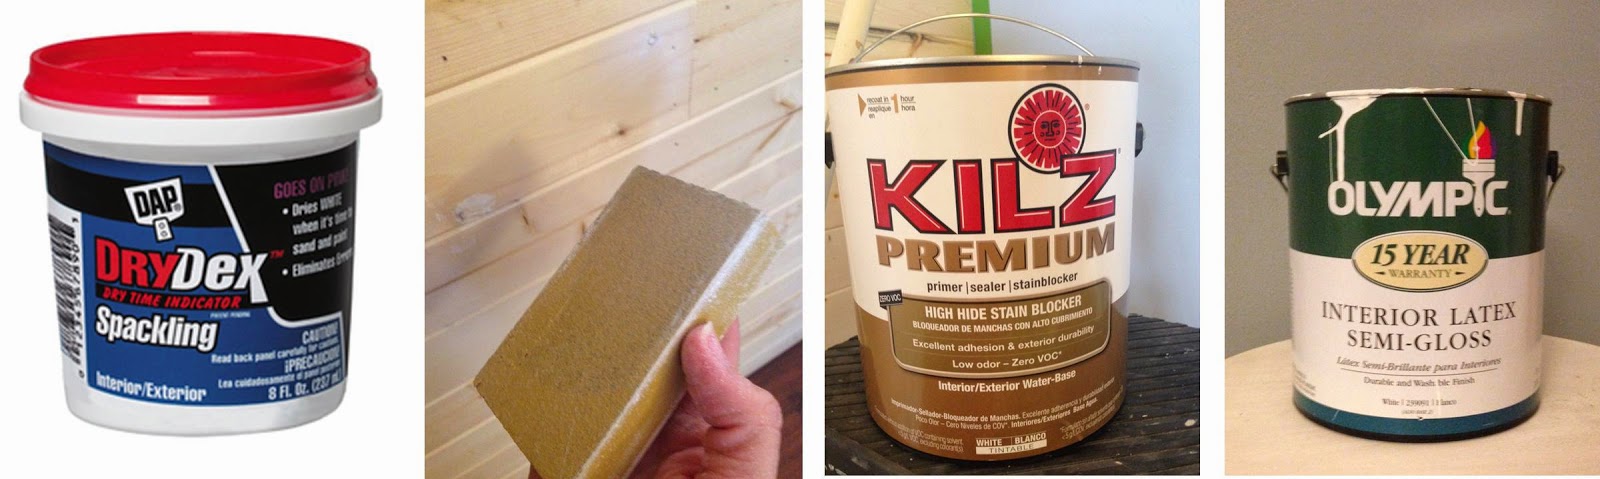
After Sam got the wall covered, it was my turn and time for spackle, primer, and paint. Here are my weapons of choice:

 
There were quite a few knots in the pine - remember I wanted rustic ;) ;) - no problem because I knew I was painting them. The spackling took patience – fill holes, wipe with damp cloth, let dry, fill again (because it shrinks), wipe with damp cloth, let dry, and finally, lightly sand. I used a sanding block because it’s easier to keep it nice and flat. After letting the dust settle (and promptly wiping it off) it was time for paint. Two coats of primer and two coats of paint later, we have a beautiful plank wall!

As a reminder, here's the before:


And after:

 
(You have to please excuse my photography. The afters were taken with my phone when I was between cameras. Hopefully I can get some decent shots soon. Maybe when I do a full reveal.)

We left a slight gap, about 2”, at the top because we plan on adding crown moulding to this entire room. Not to mention the sides need trimmed out, but one thing at a time, right? We’ll get there. :)
This simple wall was the best solution we could come up with to cover that awful botched drywall. It wasn’t too big of a mess to do and the total cost was around $70 - $11.00 for 6 planks in a package and we used 6 packages. That doesn’t include the spackle, paint and supplies because we already had all that.
We really love how much it brightens up the dining room AND the living room since they’re connected. If you’re on the fence about installing something like this in your own home, go for it! It’s a fairly easy project (we made all the cuts with a hand saw and a miter box), and the best thing is the character it adds to our otherwise plain 1970s ranch.


Tuesday, April 8, 2014

Yard Sale Score!

I have a love/hate relationship with Saturdays. I look forward to the day off all week, so I can get this or that done, or have a fun day with the family. But it never fails that I end up sleeping in, finally dragging myself out of bed at 8:30, and then taking an hour to drink my coffee (lovely, lovely coffee) before I even acknowledge to anyone else that I actually AM awake. Of course by then half the morning is gone, and I don’t even see the point of putting makeup on. By the afternoon I’m cursing myself that I didn’t get anything done, and what’s the point, I’ll just take a nap now! Boooooo!

But a couple of Saturdays ago I actually did something productive and fun! My Mom called me wanting to find some yard sales, and despite having a hard time finding a decent sale in our small town, we hit the jackpot. I knew it was gonna be awesome as soon as I spotted all the furniture peeking through the trees! The lady selling everything had closed her insurance office, so there were desks, armoires, chairs (you get the idea.) She had all kinds of office junk stacked on this old desk, but I knew right away it was AMAZING! Check it out!


It’s almost the size of my dining table with some really fun features and I actually love how its beat up a little bit. I never look for perfection in the pieces that I buy. A little character always does a piece of furniture good. And I don’t solely look for antique or used furniture when I’m in need of something. I’ll buy new if I think the quality is good and the price is right. I have a good mix of both old and new in my home. But I will say that I rarely find new furniture that is as well built and solid as older furniture. (At least anything that I can afford.)
I’ll be opening it up to show off the awesome features and give a short tutorial on cleaning up old furniture (namely getting that musty smell out) next week. Right now, I’m just glad the hubs has somewhere else to work besides the breakfast bar or dining table. I’m sure he’s glad, too. J

Monday, January 13, 2014

Inspired and Motivated

I did it again. I waited until the last minute. I stretched myself too thin, staying up waaayyy too late and waking up at the crack of dawn. I do it every. single. year. And then I promise myself "next year will be different," "I'll start in October, and plan everything ahead of time." Yeah, I'm talking about Christmas. The decorating, gift buying, and get togethers. My point is I wore myself out. I ended up sick and dragging myself into the new year.

my family and I ringing in the New Year with a little bubbly (grape juice)

Well, I've gotten myself healthy and I'm feeling extremely inspired and motivated. I had a bit of a revelation after reading this post from The Nester. She says she figured out early on that she is not a "full reveal" type of blogger. She shares everything along the way, including the not so pretty stuff. It's not a new concept by any means, but reading that this past weekend made me realize I should probably do the same. It takes me forever to pull a room together in my home. Mostly because I can't commit as much time as I would like. So, I'll be sharing my dining room progress soon. But for now, I'm off to my full time job!

Monday, December 16, 2013

The Christmas Tree: Pages and Peacocks

Wow! How is it already only NINE days until Christmas! I thought I was so on top of things when I got my shopping done before Dec. 1, so I could enjoy the rest of the season. I guess I have been enjoying a little more free time than usual, but now I have to get it together and wrap everything, make all kinds of goodies, and do all the other things that come along with this beautiful but crazy time of year.

Last time I was here, I put together my Christmas tree inspiration. And this is what I came up with:


And now, at night . . .


After having a very neutral tree for the last couple of years, we were all ready for some color. I know its hard to see in the nighttime photo, but the peacock blue, lime green and gold are great together. The pennant banners are book pages that I just sewed together.


Easy peasy! My tree's been up for a while now, but I waited for pictures until I had the faux fireplace and mantel done. I'm sure you spied those in the background. I'm hoping to detail that project along with my book page wreath later this week.


For me, Christmas is all in the details. I have little touches all throughout our home and they make me so happy. Maybe a little Christmas tour is in order if I can manage it in between all the impending wrapping and baking. ;)

Tuesday, November 26, 2013

Christmas Tree Inspiration

I said I was going to put together a Christmas tree moodboard, but then I totally spaced. Wop, wop :( It's all good though because I've been working on a bigger project that I'll share soon. Hint:


It rhymes with mining boom and I put together a mood board for it over a year ago. I have time management issues people. I'm working on it.

Anyway, I knew what colors I wanted for this year and that I would incorporate a lot of the decor I've used in the past. Here's last year's tree:
 

That's landscaping burlap wrapped around the tree. Yep, ya gotta be resourceful when living in a small town.

Here's this year's inspiration:


The only thing new for this tree will be the blue and lime ornaments. I have a ton of gold (I've used gold in every tree we've had for the past 10 years). I like the look of the gold frame and the mirrored star, although I'm not sure yet how I'll use them. That's half the fun! (And why it takes a week to decorate my tree.) The tiny book page flag represents a garland I'm planning, and the furry blanket will be my tree skirt.

So that's that. Now I just need to get started! I do have the tree up with the lights on, so at least that much is out of the way! :)

Thursday, November 14, 2013

Simple Fall Garland

As is my usual style, I have a fall craft just in time for Christmas. :) I actually started this super simple craft before Halloween and then finished it sometime right after Halloween. This isn't just a fall specific craft either. You could put together any color scheme, for any holiday or even as a cute accent in a kid's room.


This was so easy, I don't know why it took me so long to get it done. I already had all the felt left over from kid's school projects. All I did was trace and cut out 80 circles and it only took me about 45 minutes. I had one sheet of each color and I got 20 circles from each sheet. So you could end up with more or less depending on the size of whatever you're tracing. I don't even know what I was using. It was just a plastic circle off of a toy I think.
 
Then, the circles sat on my kitchen counter for two weeks. This step is not required or recommended. ;)
 
Finally, I set up the sewing machine, picked a stitch that would hold these puppies together and went to town. This was the fun part. And it was fast. I just fed the circles in one after the other, back stitching the ones on each end. I made two garlands and put one on my mantel and the other on the shelf over my coffee bar.
 
 
They're just thrown up there casually, just hanging on like it's no big deal. Because it's not. And that's why I like it.
 
I'm working on switching up my Christmas tree color scheme, so prepare yourself for a Christmas tree mood board. I don't want to scare anybody, but C-Day is only 40 days away!

Monday, October 7, 2013

Fall Is In The Air

Sunday's weather was amaaazzzing! It finally felt like fall, so of course I got inspired to make it feel like fall around the house. Sunday is my shopping day, and while I was at the grocery store I picked up a few pumpkins and gourds. I don't like to go overboard (I save that for Christmas ;P), so I just have a few decorated spots. I'm putting the finishing touches on everything this week, and then I'll share my spaces this Thursday. For now here are some things from Pinterest that are inspiring me for the season. Enjoy!

Fun and not at all creepy Halloween porch by Hi Sugarplum!
 

"Fall Greetings" pillow from Opulent Cottage

Pottery Barn styled Halloween porch
 

Perfect Autumn front porch by Centsational Girl
 
Fall quote chalkboard print by Dear Lillie
 
Classic fall tablescape from Thrifty Décor Chick
 
Pumpkin topiary and monogram pumpkin from Our Fifth House

Thursday, October 3, 2013

Global/Industrial Bedroom Inspiration Board

 
I don't know how it happened, but I now have a preteen. o_O She's pretty awesome. She's bossy and independent, loves school, reading, music, and her friends. As she enters teen-hood, I would love to give her a fun space where she can get cozy and read a book or hang out with friends. She's not into anything girly and frilly, so I came up this colorful global/industrial mood board.


It has a feminine feel, without being over the top girly. Just a few changes could easily turn this into a boy's room. Actually, this boys bedroom by Lauren Liess (done for one of her boys) was an inspiration for this design.
 
Here are the details:
 
  1. Wall color - Rocky Mountain Sky by Behr (her only request is that the walls are blue).
  2. DIY reclaimed wood headboard with these outdoor light fixtures from Home Depot - perfect for late night reading!
  3. Neutral bedding with lots of pillows in patterns with a global like Ikat. Flokati pillows for texture. A furry throw at the foot of the bed would be fun too!
  4. Large 8x10 Persian rug. I've found several affordable options on sites like Amazon and Overstock.
  5. Drop cloth curtains with patterned trim. I've already made the curtains for her room; I just need to add the trim.
  6. Papasan chair with a cushion like this one from Pier 1.
  7. A wicker light fixture to hang over the chair for reading. I would love to DIY this.
  8. Industrial style shelving for all the things a girl collects. (And mine collects A LOT!)
  9. A distressed chest of drawers with painted numbers (like the one above) or words (like this one) for lots of character. I'd like to find a yard sale or thrift store piece and transform it myself.
I love this room! I can't wait to put it together, but I have no time frame for it right now - I just have too much on my plate. I'm working on being more efficient with these things, working them in between my full time accounting job, so we'll see.
 
Next up is a mood board for my youngest. She's reeeeaaally girly (totally opposite of her sister), so girly, frilly stuff will definitely play a part. Fun stuff! :)

Monday, September 30, 2013

Taking Care of Business

While I'm not posting as often as I'd like to yet, there are some things happening behind the scenes with my little business. The most exciting being my new business cards.


My cousin Holly, whipped these beauties up for me. They're gold-leafed on the sides! Ahhhh! So pretty! AND there's a QR Code! Ahhhh! So techy!

Holly's really creative and talented, and she's planning on starting her own graphic design/paper goods business. As soon as she makes her contact info available, I'll share it. And I'm sure she'll start her own blog too. :)

And look for a couple of new tabs on the blog: About, Services, Portfolio, and Contact. They're still under construction for the most part, but I'll be updating them soon.

I'll be back later in the week with a new moodboard I threw together for my preteen. :) Ciao!

Tuesday, August 13, 2013

Designer Crushes

Just a quick post about a few of my favorite designers.

I first discovered Sarah Richardson on HGTV. Her shows don't air too often here in the US, but it didn't take long for me to fall in love with her work.


There's something very playful about Sarah Richardson's designs, even if it's a neutral room like the first picture. She mixes colors and patterns PERFECTLY! You'll find tons of inspiration on her website.

Tobi Fairley's work is a very recent find for me. Which is kind of sad considering she's based out of my home state of Arkansas!


Tobi uses elements with traditional lines, but there's a really fun color story going on. Just check out that Christmas tree she did for her daughter! That's one lucky kid! Take a look at Tobi Fairley's website for more of her amazing work.

And last, but certainly not least is my FAVORITE designer to date. I found Lauren Liess through a Better Homes & Gardens article a couple of years ago and I've been hooked on her blog ever since.


Lauren's work has this amazing calming affect for me. It's eclectic and comfy, yet very elegant at the same time. She's so inspiring to me especially, because she's not a traditionally educated designer. Lauren left a career in public relations to follow her passion. Visit her website to read more of her story.

Obviously I've got Christmas on my mind. I can never resist a great tree!

Wednesday, August 7, 2013

Changes

Not that this blog was established enough that changing things up is earth-shattering. A name change and a new look, to get me back on track with what I really want out of my little corner of the internet. I just need a place to log some inspiration and to talk about my journey into the world of interior design. Whether it grows into anything more than that, I'll just have to see. And I may jot a word or two down along the way. Who knows . . .

 
from here


Monday, February 11, 2013

Simple Valentine's Mantel

I don't do much for Valentine's Day, although I think I have more going on this year than last. When I put up the faux mantel for Christmas, I intended to take it back down. But when it was sitting there bare after taking the stockings off I just decided I'd decorate it for all the holidays. So here's Valentine's.


The XOXO bunting and the tiny dictionary bunting (which I am just gaga over!), were super easy and it only took me about 30 minutes to do both. Here's a close up of the ADORABLE dictionary bunting. Inspiration from here.


OMG I love it!!! It is soooo cute! When Valentine's is over I think I'll pin it up somewhere in my girly girl Emma's room. And this was so easy to make. I have a couple of old books (they're old encyclopedias, but let's just call them dictionaries for fun) that I use for projects like this. I just free handed the bunting shape with my scissors, layered some scrapbook paper hearts, and then fished out some white buttons from my sewing box. I didn't even bother gluing the hearts or buttons on, I just sewed them right through and that's holding the whole thing together. Plus the stitches are my favorite part!


The XOXO bunting is pretty self explanatory. I free handed all the shapes, punched some holes and strung it up. (I really love the shadows it makes!) And I just did a simple print out of the classic Beatles lyric, "All You Need Is Love." If you're curious, I use Microsoft Publisher for things like this. I don't know many people who use this, but its easy and I'm familiar with it. Those tissue pom-poms are from a cousin's wedding shower. I made about 30 of them. And yes, I kept every. single. one. They come in handy, and when I'm not using them, they just hang from the ceiling in Emma's room.

The finial thing and the turquoise bowl are some of those things that migrate around my house year round. I think they finish the mantel out nicely. And did I mention, this whole project was free! I had everything on hand. Love it when that happens!

I know we'll only enjoy it for the rest of this week, but it's one of those things that makes me smile when I walk past. And I do think my family appreciates the little bit of cheeriness in that corner. That's what I tell myself anyway. :)

So what about you? Do you decorate for Valentine's or just let it pass by? Are you doing anything for St. Paddy's Day? I have something I made last year that I'll be putting back out. That is if it survived being packed in my craft closet all year. We'll see . . .

P.S.: I've linked up to Katie's Lovely Crafts Linky Party over at Bower Power. Check it out!

Sunday, February 10, 2013

2013 Goals: Part 1

You may be thinking, "2013 Goals? Isn't it February already?" Yeah, I'm a little behind. But only if you're sticking to the conventional idea of making resolutions at the beginning of the year. And we don't have to do that! Yay! So here we go:

Goals for my home:

#1 - Finish it! I don't know if I've mentioned this before, but we've lived in our house for almost TEN YEARS. We've done a ton of work, but there are so many finishing touches that need to be done that it drives me crazy! And when I say finish it, I don't mean decorating, I mean I need baseboards and thresholds in places, plus a few other small things. Don't get me wrong, my house doesn't look like an unfinished mess - in fact most people don't even notice until I point it out (which I can't NOT do - it's an illness).  The goal here comes down to me choosing ONE thing to finish every week. I'll make a list and keep you updated.


#2 - My dining room. 'Nough said.

#3 - The girls' rooms. I have some ideas for redecorating my girls' bedrooms, I just need to make a couple of mood boards.

                                                            via                                          via

#4 - Sell this house. Yep, you heard that right. And you may think the other goals seem pointless now, but as long as we live here I'll be making it as comfortable (and pretty) as possible. We want to sell this house and buy something with more space, inside and out. This has been a goal of ours for a couple of years now, but we haven't found anything in our area that makes us want to take that leap. We live in a VERY small town and there's not that much for sale. So we just keep looking. The good news for this blog is it'll be a whole new place to decorate (and probably renovate)!

I'm worn out just typing all this down. I'll be back tomorrow to share my simple Valentine's mantel and later this week I'll share my blog goals (that would the Part 2). Please tell me I'm not the only one with these kind of unfinished projects? I'm telling ya, I think they multiply!


Tuesday, January 22, 2013

The Only Reason For Time . . .


. . . is so that everything doesn't happen at once. Thank you for the perspective Mr. Einstein.


(my kitchen chalkboard)
 

I've had this thought-inducing quote pinned for a while now, but only when I came across it during the hectic holiday season did it hit home. My last post was like, nine weeks ago. Things got a little crazy around here. I won't bore you with all the details, but there was a lot of basketball, eating too much at Thanksgiving, and many Christmas festivities with our families.

(my tree, making cookies, Christmas morning, and a couple of my gifts)

In the middle of it all, I would stop and think about this little blog and that I needed to post something, anything. But I just never got around to it. And the most I got done with my dining room (which was going to be done before Christmas, remember that) is some paint samples on the wall.

All this to say, I realize I can't do everything at once, but it will come IN TIME.

I'll be back soon to share some of the goals I have for my home and for this blog. Peace out.

Monday, November 19, 2012

FAUX FAUX FIREPLACE

No, that's not a typo. I really did make myself a faux faux fireplace. Let me explain. It all started when I dreamed up a faux fireplace to go next to my Christmas tree this year. I thought of this, like, a month ago. And then I kept thinking about it. Along with my dining room plans . . . that's right, my plans to have the "big stuff" finished before Christmas are quickly running away from me. Of course, it doesn't help that I coach 3rd and 4th grade girls basketball two nights during the week and almost all day on Saturdays. AND I still have to participate in all the normal holiday insanity, too. Anyway . . .

Here are a couple of the faux fireplaces that sparked the thought:

 
(from here and here)

Here is the spot for my fireplace. This is my buffet that I decorate for every season. I didn't do a whole lot for fall:


And here it was for Halloween:


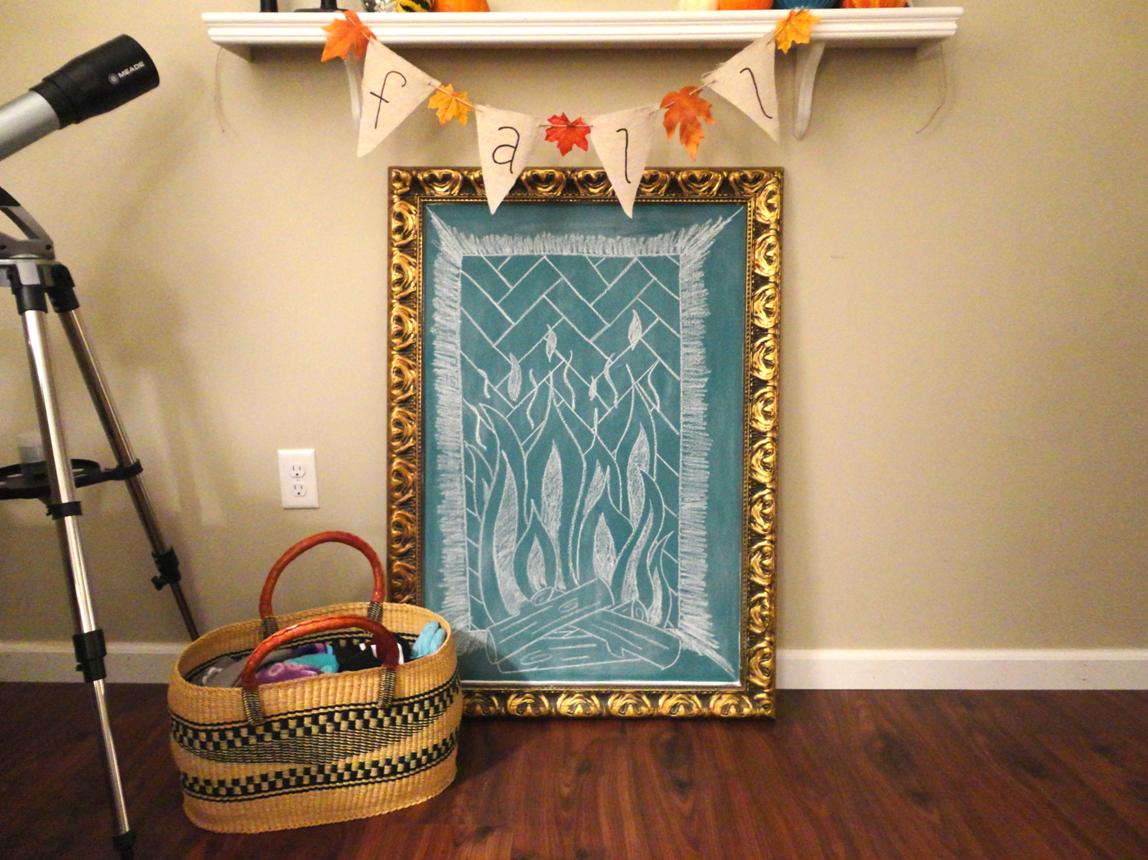
This morning I decided to get a move on the faux fireplace. I woke up and drew some plans to figure out what materials I would need from Lowe's. And then I got lazy. I didn't really want to leave the house. (I get that way on Sundays.) Luckily, I already had a perfectly good shelf I built months ago. And I knew I wanted a chalkboard "firebox". So, a four foot already DIYed shelf, plus a large already DIYed chalkboard, equals a faux faux fireplace!

Here's my lovely assistant helping me decide whether this was going to happen or not. (Insert child labor joke here :P )

 
I really didn't get any "during" pics, because it was that easy. Hang shelf, prop up chalkboard, draw a cozy fire, and style shelf. Easy peasy!

 
The shelf is hung four feet from the floor and the mirror is about five inches above it. You may have noticed I turned the mirror horizontal for this. I just switch the hardware to the long side. It's easy. I've done it a couple times over the years. I really didn't plan on styling it for fall, considering I'll just be taking it down to do Christmas next weekend. But alas, I couldn't resist.


I made the "FALL" banner last month before I started the blog. It's super simple. Just some fake leaves I already had, and some pennants cut from a drop cloth. I borrowed a brown marker from my girls' school box and free-handed the letters. It's all strung up on a length of twine. If you haven't noticed, I like easy. :)


The basket on the floor holds winter wear: gloves, scarves, hats. I want to put birch logs, greenery, and twinkle lights in there for Christmas.
 
In these pictures, it looks like it needs something along the sides to make it more fireplace-y (you know what I mean.) But, in person it's pretty awesome. Obviously, this will be the landing spot for our stockings this year (they were just hung on the wall in the past.) And I can't wait until I get my tree up next to it!
 
So there you have it, the lazy girl's faux faux fireplace.

Tuesday, November 6, 2012

Dining Room Mood Board

This project is the real reason I started this blog. I wanted to make myself accountable for actually getting it done. I dream of a beautifully decorated dining room that ties perfectly into my living room. But that's the problem . . . all I've done is DREAM about it. I've stalked mood boards on other blogs for a couple years now, not really thinking I could just put one together myself. So that's what I finally did. But first, here are the before shots.


Scary. I know. I've hated the terra cotta color for a looooong time. I'm not sure I ever really liked it. A big problem with the paint is that the finish is a semi-gloss. Big no-no, because this room has a MILLION imperfections, and every one of them is shining because of that finish. (Bad advice from the guy at the paint counter.) I've never repainted because I wanted to have a clear direction for the whole room before I just ran out and got more paint.

Another thing I hate about this room is that it doubles as my husband's office. This house is only 1532 square feet, so there's not an extra room to be used as an office. No matter how many times he straightens this corner up it inevitably ends up looking like this.


Unfortunatelly, I can't move his workspace elsewhere, so we'll be working that into the design. On the bright side, I'll be getting my own workspace, too. Yay!

We have done some good things in here like open it up to the living room and raise the floor (oh yeah, did I mention this room used to be a one car garage? The previous owners closed it in, but left the floor where it was - about a foot lower than the rest of the house.) Obviously, we ran the dark laminate into this room after we raised the floor. We also added some HUGE closets that provide awesome storage space and help make the room more proportioned. Now it's about 11x15 instead of 11x19.

So without further ado, here's my dining room mood board.


  1. Wall color: This one is Restoration Hardware's Silver Sage, but I'll probably color match it at my local home improvement store.
  2. Built-in bookcase with a window seat and double desks, painted in the trim color to match the rest of the house (bright white).
  3. Crisp white drapes layered over natural bamboo blinds to tie in with the living room window treatments.
  4. Gray 8x10 rug for a graphic punch like this one from Z Gallerie. This one is a little a lot pricey for me, so I'll hopefully be hunting down a deal.
  5. Storage bench in a lively lime green for a major injection of color ~ I'd like to DIY this.
  6. More natural texture in the form of a couple of these dining chairs from Pier 1.
  7. Pillows for the window seat in a bold graphic and a modern floral.
As you can see from the before pics, we already have a great pendant (this one from Lowe's) hanging over our dark mission style dining set. We bought this set from JCPenney eight or nine years ago. It still looks great and I love that it expands, so I just want to change up the seating.

 
As far as a schedule, I'm hoping to be finished by the end of January. I want the laborious stuff, paint and built-ins, done before Christmas (I might have just LOL-ed at that sentence, but it's worth a try.) That means January will just be a matter of accessorizing.

I'd like to do this whole project for between $500 and $750. I know the built-ins are going to be a big chunk, but I'd like to save some money with sales, shopping around, and DIYing as much as I can.

Of course, I'll let you know how I'm doing along the way!