Monday, November 19, 2012

FAUX FAUX FIREPLACE

No, that's not a typo. I really did make myself a faux faux fireplace. Let me explain. It all started when I dreamed up a faux fireplace to go next to my Christmas tree this year. I thought of this, like, a month ago. And then I kept thinking about it. Along with my dining room plans . . . that's right, my plans to have the "big stuff" finished before Christmas are quickly running away from me. Of course, it doesn't help that I coach 3rd and 4th grade girls basketball two nights during the week and almost all day on Saturdays. AND I still have to participate in all the normal holiday insanity, too. Anyway . . .

Here are a couple of the faux fireplaces that sparked the thought:

 
(from here and here)

Here is the spot for my fireplace. This is my buffet that I decorate for every season. I didn't do a whole lot for fall:


And here it was for Halloween:


This morning I decided to get a move on the faux fireplace. I woke up and drew some plans to figure out what materials I would need from Lowe's. And then I got lazy. I didn't really want to leave the house. (I get that way on Sundays.) Luckily, I already had a perfectly good shelf I built months ago. And I knew I wanted a chalkboard "firebox". So, a four foot already DIYed shelf, plus a large already DIYed chalkboard, equals a faux faux fireplace!

Here's my lovely assistant helping me decide whether this was going to happen or not. (Insert child labor joke here :P )

 
I really didn't get any "during" pics, because it was that easy. Hang shelf, prop up chalkboard, draw a cozy fire, and style shelf. Easy peasy!

 
The shelf is hung four feet from the floor and the mirror is about five inches above it. You may have noticed I turned the mirror horizontal for this. I just switch the hardware to the long side. It's easy. I've done it a couple times over the years. I really didn't plan on styling it for fall, considering I'll just be taking it down to do Christmas next weekend. But alas, I couldn't resist.


I made the "FALL" banner last month before I started the blog. It's super simple. Just some fake leaves I already had, and some pennants cut from a drop cloth. I borrowed a brown marker from my girls' school box and free-handed the letters. It's all strung up on a length of twine. If you haven't noticed, I like easy. :)


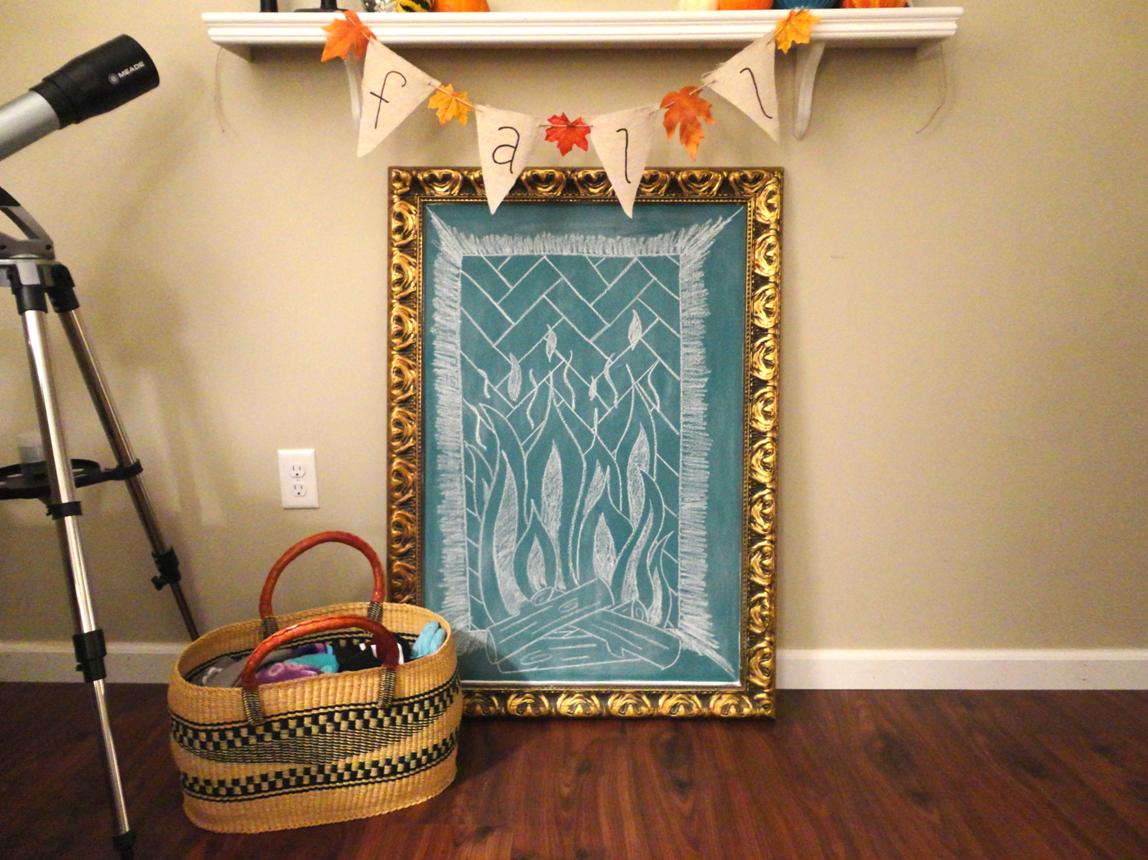
The basket on the floor holds winter wear: gloves, scarves, hats. I want to put birch logs, greenery, and twinkle lights in there for Christmas.
 
In these pictures, it looks like it needs something along the sides to make it more fireplace-y (you know what I mean.) But, in person it's pretty awesome. Obviously, this will be the landing spot for our stockings this year (they were just hung on the wall in the past.) And I can't wait until I get my tree up next to it!
 
So there you have it, the lazy girl's faux faux fireplace.

Tuesday, November 6, 2012

Dining Room Mood Board

This project is the real reason I started this blog. I wanted to make myself accountable for actually getting it done. I dream of a beautifully decorated dining room that ties perfectly into my living room. But that's the problem . . . all I've done is DREAM about it. I've stalked mood boards on other blogs for a couple years now, not really thinking I could just put one together myself. So that's what I finally did. But first, here are the before shots.


Scary. I know. I've hated the terra cotta color for a looooong time. I'm not sure I ever really liked it. A big problem with the paint is that the finish is a semi-gloss. Big no-no, because this room has a MILLION imperfections, and every one of them is shining because of that finish. (Bad advice from the guy at the paint counter.) I've never repainted because I wanted to have a clear direction for the whole room before I just ran out and got more paint.

Another thing I hate about this room is that it doubles as my husband's office. This house is only 1532 square feet, so there's not an extra room to be used as an office. No matter how many times he straightens this corner up it inevitably ends up looking like this.


Unfortunatelly, I can't move his workspace elsewhere, so we'll be working that into the design. On the bright side, I'll be getting my own workspace, too. Yay!

We have done some good things in here like open it up to the living room and raise the floor (oh yeah, did I mention this room used to be a one car garage? The previous owners closed it in, but left the floor where it was - about a foot lower than the rest of the house.) Obviously, we ran the dark laminate into this room after we raised the floor. We also added some HUGE closets that provide awesome storage space and help make the room more proportioned. Now it's about 11x15 instead of 11x19.

So without further ado, here's my dining room mood board.


  1. Wall color: This one is Restoration Hardware's Silver Sage, but I'll probably color match it at my local home improvement store.
  2. Built-in bookcase with a window seat and double desks, painted in the trim color to match the rest of the house (bright white).
  3. Crisp white drapes layered over natural bamboo blinds to tie in with the living room window treatments.
  4. Gray 8x10 rug for a graphic punch like this one from Z Gallerie. This one is a little a lot pricey for me, so I'll hopefully be hunting down a deal.
  5. Storage bench in a lively lime green for a major injection of color ~ I'd like to DIY this.
  6. More natural texture in the form of a couple of these dining chairs from Pier 1.
  7. Pillows for the window seat in a bold graphic and a modern floral.
As you can see from the before pics, we already have a great pendant (this one from Lowe's) hanging over our dark mission style dining set. We bought this set from JCPenney eight or nine years ago. It still looks great and I love that it expands, so I just want to change up the seating.

 
As far as a schedule, I'm hoping to be finished by the end of January. I want the laborious stuff, paint and built-ins, done before Christmas (I might have just LOL-ed at that sentence, but it's worth a try.) That means January will just be a matter of accessorizing.

I'd like to do this whole project for between $500 and $750. I know the built-ins are going to be a big chunk, but I'd like to save some money with sales, shopping around, and DIYing as much as I can.

Of course, I'll let you know how I'm doing along the way!

Saturday, November 3, 2012

Friday, November 2, 2012

Fall Bucket List


I didn't plan on writing a post tonight, but my in-laws were just over and my sister-in-law noticed the Fall Bucket List I threw together a few weeks ago. It gave me the idea to share it, so everyone could be reminded to stop and make some fall time memories with their kids. I know fall is more than halfway over, but maybe you've already done a few of these things and could go ahead and check them off. I love checking things off a list. I feel so accomplished. :)

I originally got the idea from Pinterest (where else) and I wish I could give credit to that original bucket list, but my pin didn't have a good link. Hate it when that happens. I printed mine out on cardstock and stuck it in an empty 8x10 frame (I had to trim the edges). I check things off with a dry erase marker on the glass, so I can easily wipe it off. Not that I can reuse this because it's dated, but it seems to make it neater.

Here's how mine looks at this point:


I haven't quite gotten the hang of taking good pictures of my house. I need to figure out lighting and flash and basically everything else. In case you can't read it, here's the list. 
  •  Apple picking
  •  Make leaf art
  •  Go on a hayride
  •  Have a photoshoot in a leaf pile
  •  Enjoy a bonfire with s'mores
  •  Make caramel apples
  •  Corn maze!
  •  Go to pumpkin patch
  •  Make fall cookies
  •  Pinic
  •  Take a nature walk (bring the camera!)
  •  Trick-or-treat
  •  Bake pies
  •  Decorate (carve/paint) pumpkins
  •  Drink fancy coffee drinks
 
We may not get every single thing checked off, but I didn't make it so that we would be pressured to do them. I just want to be reminded. Here's the list. Now go have fun!

Tuesday, October 30, 2012

Challenge Accepted . . . Numbered Cork Coasters


I've had these painted coasters pinned for, like, ever. So when Katie and Sherry issued the Fall Pinterest Challenge, I got my butt up off the couch and sat my butt at the dining table to paint me some coasters. The awesome sad thing about this project is I've had ALL the supplies on hand for months.
 
 
(from here and here)
 
I love the glossy paint against the natural texture of the cork. Ahhhh . . . Balance.
 

I'll apologize in advance for the horrible phone pics. My camera battery was deeeaaad (of course). Here's the supply list:


  - Cork coasters: I found these in the indoor plant section at Lowe's for about $1 each. I
    guess you put tiny potted plants on them?
  - Paint: I used white acrylic paint and a deep teal sample from Lowe's called Teal Zeal.
  - Paint brushes and a pencil
  - Painter's tape: Optional, depends on your design
  - Printed numbers/letters/whatever: If you're doing letters/numbers/symbols, printing from  
     Word works great. The font I used is called Georgia. I think it's simple, yet elegant. Pinky
     out.


Step #1:  Draw your preferred designs on with a pencil and/or tape off with painter's tape.
                  I'm really into chevron, like everyone else. ;) I just taped off one line of chevron as
                a guide and free-handed the other lines.


Step #2:  Paint your designs on. I was at a loss for a forth design, so I free-handed some
                brackets. I love them almost as much as chevron.


Step #3:  Trace your numbers. I can't remember where I saw this tracing method
                (probably Pinterest), but after you've printed your numbers/letters/whatever, flip
                the page over and color in the ENTIRE area of the design. Position the design
                and trace over with a pencil. It'll leave the design behind. This works on all kinds
                of things. I even use it when carving pumpkins. :)


Step #4:  Paint on the numbers. I used the tiniest brush I had with the sharpest point
               and painted the outline first, then filled in the rest. I had to do two coats with
                both colors.

And there you have it!


I love my new coasters! I didn't do these just because. I actually NEEDED them. I think I'll spray them with a clear coat so they last a long time.

Speaking of time, it took about an hour and a half total to finish these little beauties. But this could totally be a less-than-30 minute project if you went with simpler designs. And with the holidays coming up, these would make a perfect hostess gift!


I'll be linking up to Young House Love to show these off. Won't you join me?!

Thursday, October 25, 2012

Fall Pinterest Challenge

I've been following the AMAZING duo that is John and Sherry Petersik, over at Young House Love, for a couple years. Those people have it together. I cannot WAIT to get my hands on their first book! I preordered my copy weeks ago.

And now that I'm done gushing, I'll get back to my point. Sherry at YHL and Katie over at Bower Power (love her too!), have been putting together a little thing called the Pinterest Challenge for over a year now. It's always fun to scroll through all the different projects everyone links, and since I have my own little blog now, I'm going to join in the fun!


I'll be back on Tuesday with a simple tutorial. Stay tuned!

Tuesday, October 23, 2012

Hello . . .

. . . my name is Mlynda, and I'm addicted to DIY blogs. And shelter magazines. And home design. And entertaining. And holidays. And Pinterest. Don't forget Pinterest. It's an illness. Just ask my husband. "Project" is a four letter word in his book. DIY, home decor, and general homey goodness run through my head All. Day. Long. So I'm hoping I can self-medicate this addiction with a DIY/design blog all my own, in an attempt to get it outta my head and out there for the world to see. Or just my Mom. Yeah. Probably just my Mom. Hi Drexene!

I think while I'm here I need to explain the blog's name. I'm not a designer. I don't have a design company. But someday I hope to. I would love to help other people find their own style and a beautiful comfort in their homes. But for now it'll just be little ole me and my little ole house. (This blog totally could have been called Little Old House, because that's what I have!)  I guess right now I'm just reserving my future company's name. Yeah, I'm the nerd that thinks THAT far ahead. Anywho, the numbers One Two Five are significant to me. They represent my children's birthdays - the oldest born on the 1st, the youngest born on the 25th. Let's have a collective awwwww. All two of us.


Hopefully, this blog will also give me the kick in the pants I need to get my own DIY projects and home beautification going on. I'm mean, if I put it in print on the internet, I have to do it, right? 'Cause everybody knows you can't put anything on the internet that isn't true. ;)